

How To Set Up Bleed In Illustrator
Welcome to the LabelValue Blueprint Tips Mini-Series. The Design Tips Mini-Series is an 8-part installment of useful design cognition curated directly from our squad of custom label and packaging designers at LabelValue.com. We characteristic helpful hints and design software tips to help you lot in the process of designing great labels! In this week's tutorial, we will become over what exactly is a print bleed, when to use them, and how to add bleeds in Adobe Illustrator.
- Tip ane: How to Trace Objects with the Pen Tool
- Tip two: How to Equally Duplicate a Shape Around A Circumvolve
- Tip 3: How to Link and Embed Images
- Tip 4: How to use the Align Tool in Adobe Illustrator
- Tip 5: How to Set upwardly Certificate Bleeds in Adobe Illustrator - Currently Reading
- Tip six: How to Create a Clipping Mask using Adobe Illustrator
- Tip seven: How to Type on a Circle Using the Path Tool in Adobe Illustrator
- Tip viii: How to Use the Shape Builder Tool in Adobe Illustrator
As always, if you have questions feel free to achieve out to us by e-postal service. We'd dearest to hear from you!
Blueprint Tip #5: What are bleeds, and how practice I add together bleeds in Illustrator?
What Is Bleed In Illustrator?
A bleed in illustrator is a small area around the edge of your artwork that extends beyond the "finished" cut edge of your document. After printing occurs, the drain is trimmed off, creating finished artwork that stops at this cut edge. The bleeds eliminate problems that printers take of non printing exactly to the border of the paper. By designating a bleed area and trimming to size, y'all become a finished certificate that has artwork extended all the mode to the edge with no white space.
For case, say y'all want your label to have a completely green background. By extending the green background into the bleed when the label is die cut, it cuts off the designated bleed of the artwork and the outcome is a label that is completely green.
Another reason nosotros asking a bleed on your submitted artwork is to account for movement on the printing press and finishing unit. Depending on the size of your label order, your print run can be thousands of feet long. To brand sure every label finishes perfectly, we demand a petty bit of room for adjustments to proceed your label centered.
Are all bleeds the same?
While there are mutual bleed sizes, they all can vary depending on a number of variables. Here at LabelValue, we require a i.6mm drain for all labels or stickers.
The document drain function in Illustrator allows for you to hands set-up, adjust, and modify drain settings of your art file from within Illustrator. Your document bleed can exist fix up when you create a new document, or can be added to an existing art file. Both of these scenarios are covered below.
Your get-go footstep should be getting into contact with your printer. Ask them for their print requirements and guidelines. A knowledgeable printer will exist able to provide you with specifics on how yous tin set your files for success. This first interaction with a printer is a good chance for you to vet them of their agreement of the print industry.

STEP 1: Open up Adobe Illustrator and select File > "New…" in the toolbar.

STEP ii: In one case you Select > New… from the "File" Bill of fare, a new document interface will appear.

Pace 3: What nosotros advise to exercise is navigate to "More Settings" and click on it. This offers more than robust control on how your certificate is set up upwards.

Footstep 4: With the "More Settings" card open, we will begin past naming this projection "Bleed Case", giving it a size of five inches past five inches.
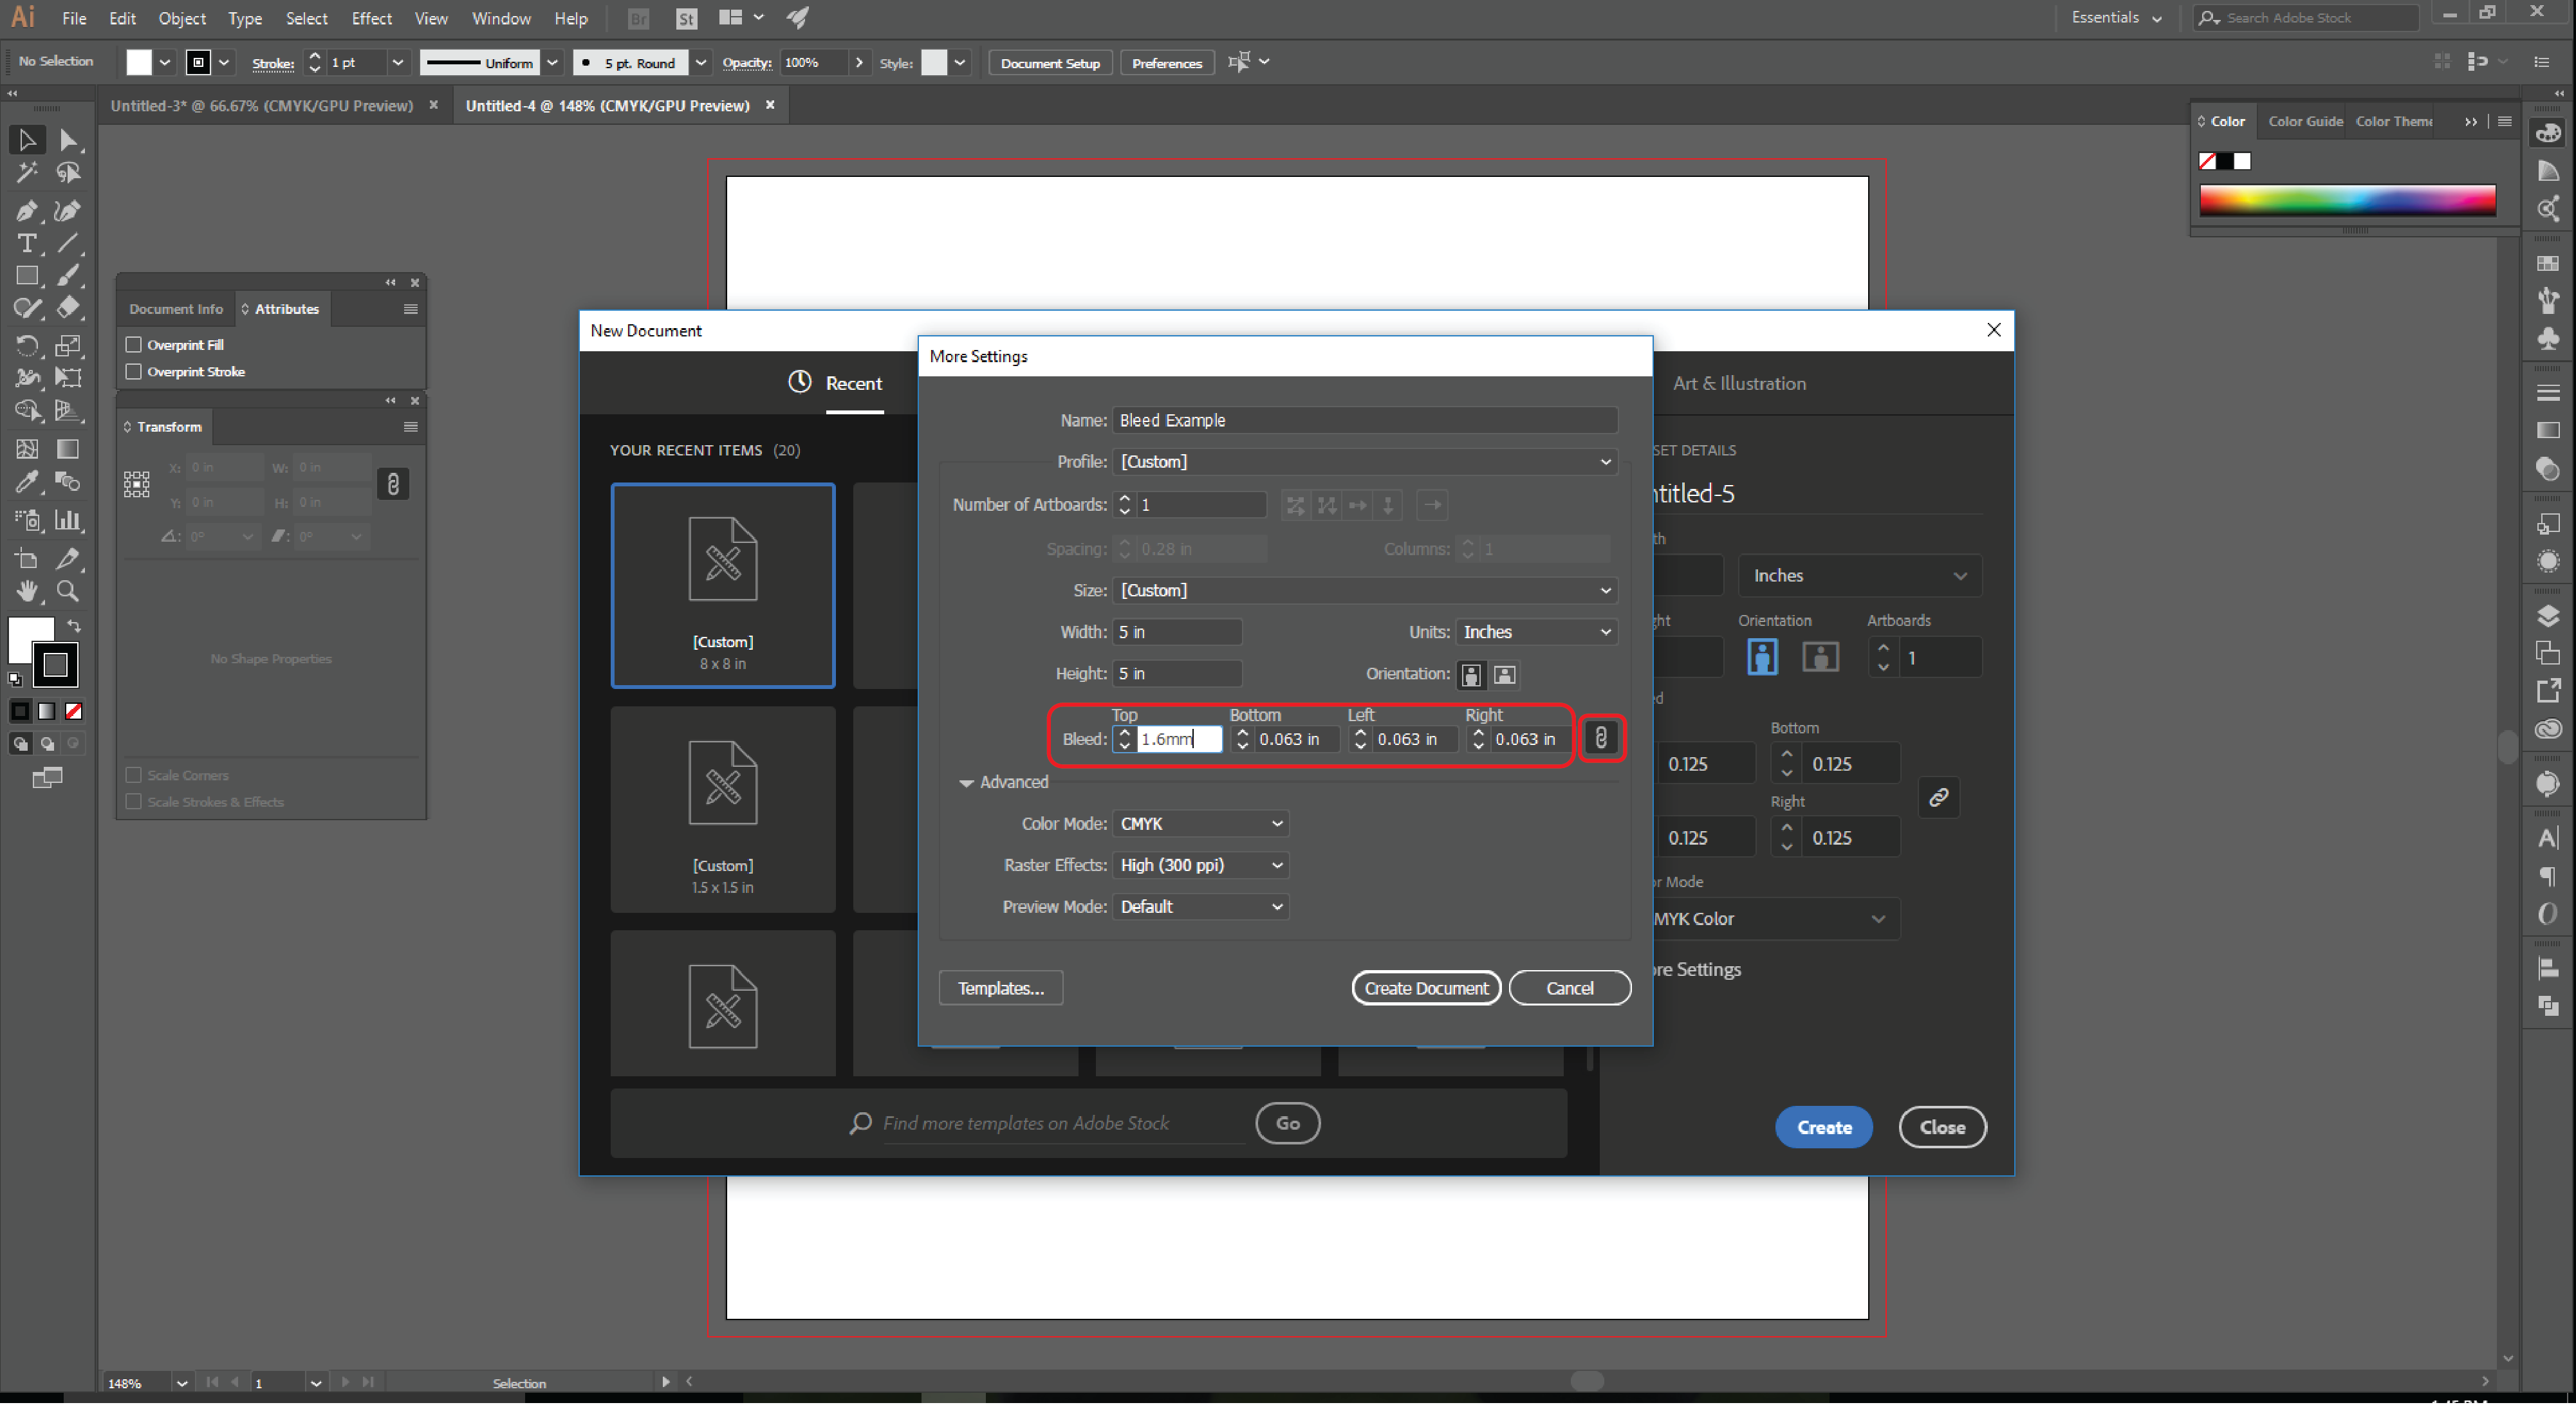
STEP 5: Subsequently our basic document settings have been selected, the side by side section in setting upward our document is the drain. Nosotros want to make sure nosotros have selected the link icon to the right of the bleed settings. This will keep all sides of your document bleed (acme, right, bottom, left) the aforementioned.
Annotation: Our default unit for document set-up is inches, but as you lot can meet, we need a bleed in millimeters. Illustrator has a great function that automatically converts different units of measurements. And then when you initially type in "1.6mm" information technology volition catechumen that measurement to inches automatically as seen to a higher place.

STEP half dozen: Once your bleed has been designated, we tin go ahead and select "Create Certificate"

STEP 7: This will open your Adobe Illustrator artboard with your selected certificate and bleed size. The white expanse is our 5" x v" area. And the red outer edge is our designated ane.6mm bleed.

Stride 8: When creating artwork that is designed to bleed, extend your background colors to the edge of the bleed. It is important to remember though, any of import information needs to stay out of the bleed area and be positioned within the document. Come across the example above to note how the document background extends to the drain edge, but all logos, graphics, and text are well away from the edge of the artboard.

STEP 9: Give yourself a condom margin from the edge of the document. You never want to place artwork directly on the document edge. When the bleeds are trimmed, you don't desire to risk losing all or office of your artwork considering it was placed too shut to the cutting line. Run into in a higher place instance of the safe area / margin equally noted by the scarlet dashed line. Typically, we recommend leaving at to the lowest degree ane/16" safe margin.

Step x: At present that we've created artwork that has been designed with a bleed, we need to save it in a fashion that the bleed information remains with the document when it'due south sent to be printed. The all-time fashion to do this is to save it as a .PDF. To do this, navigate to File on the toolbar and select "Relieve As".
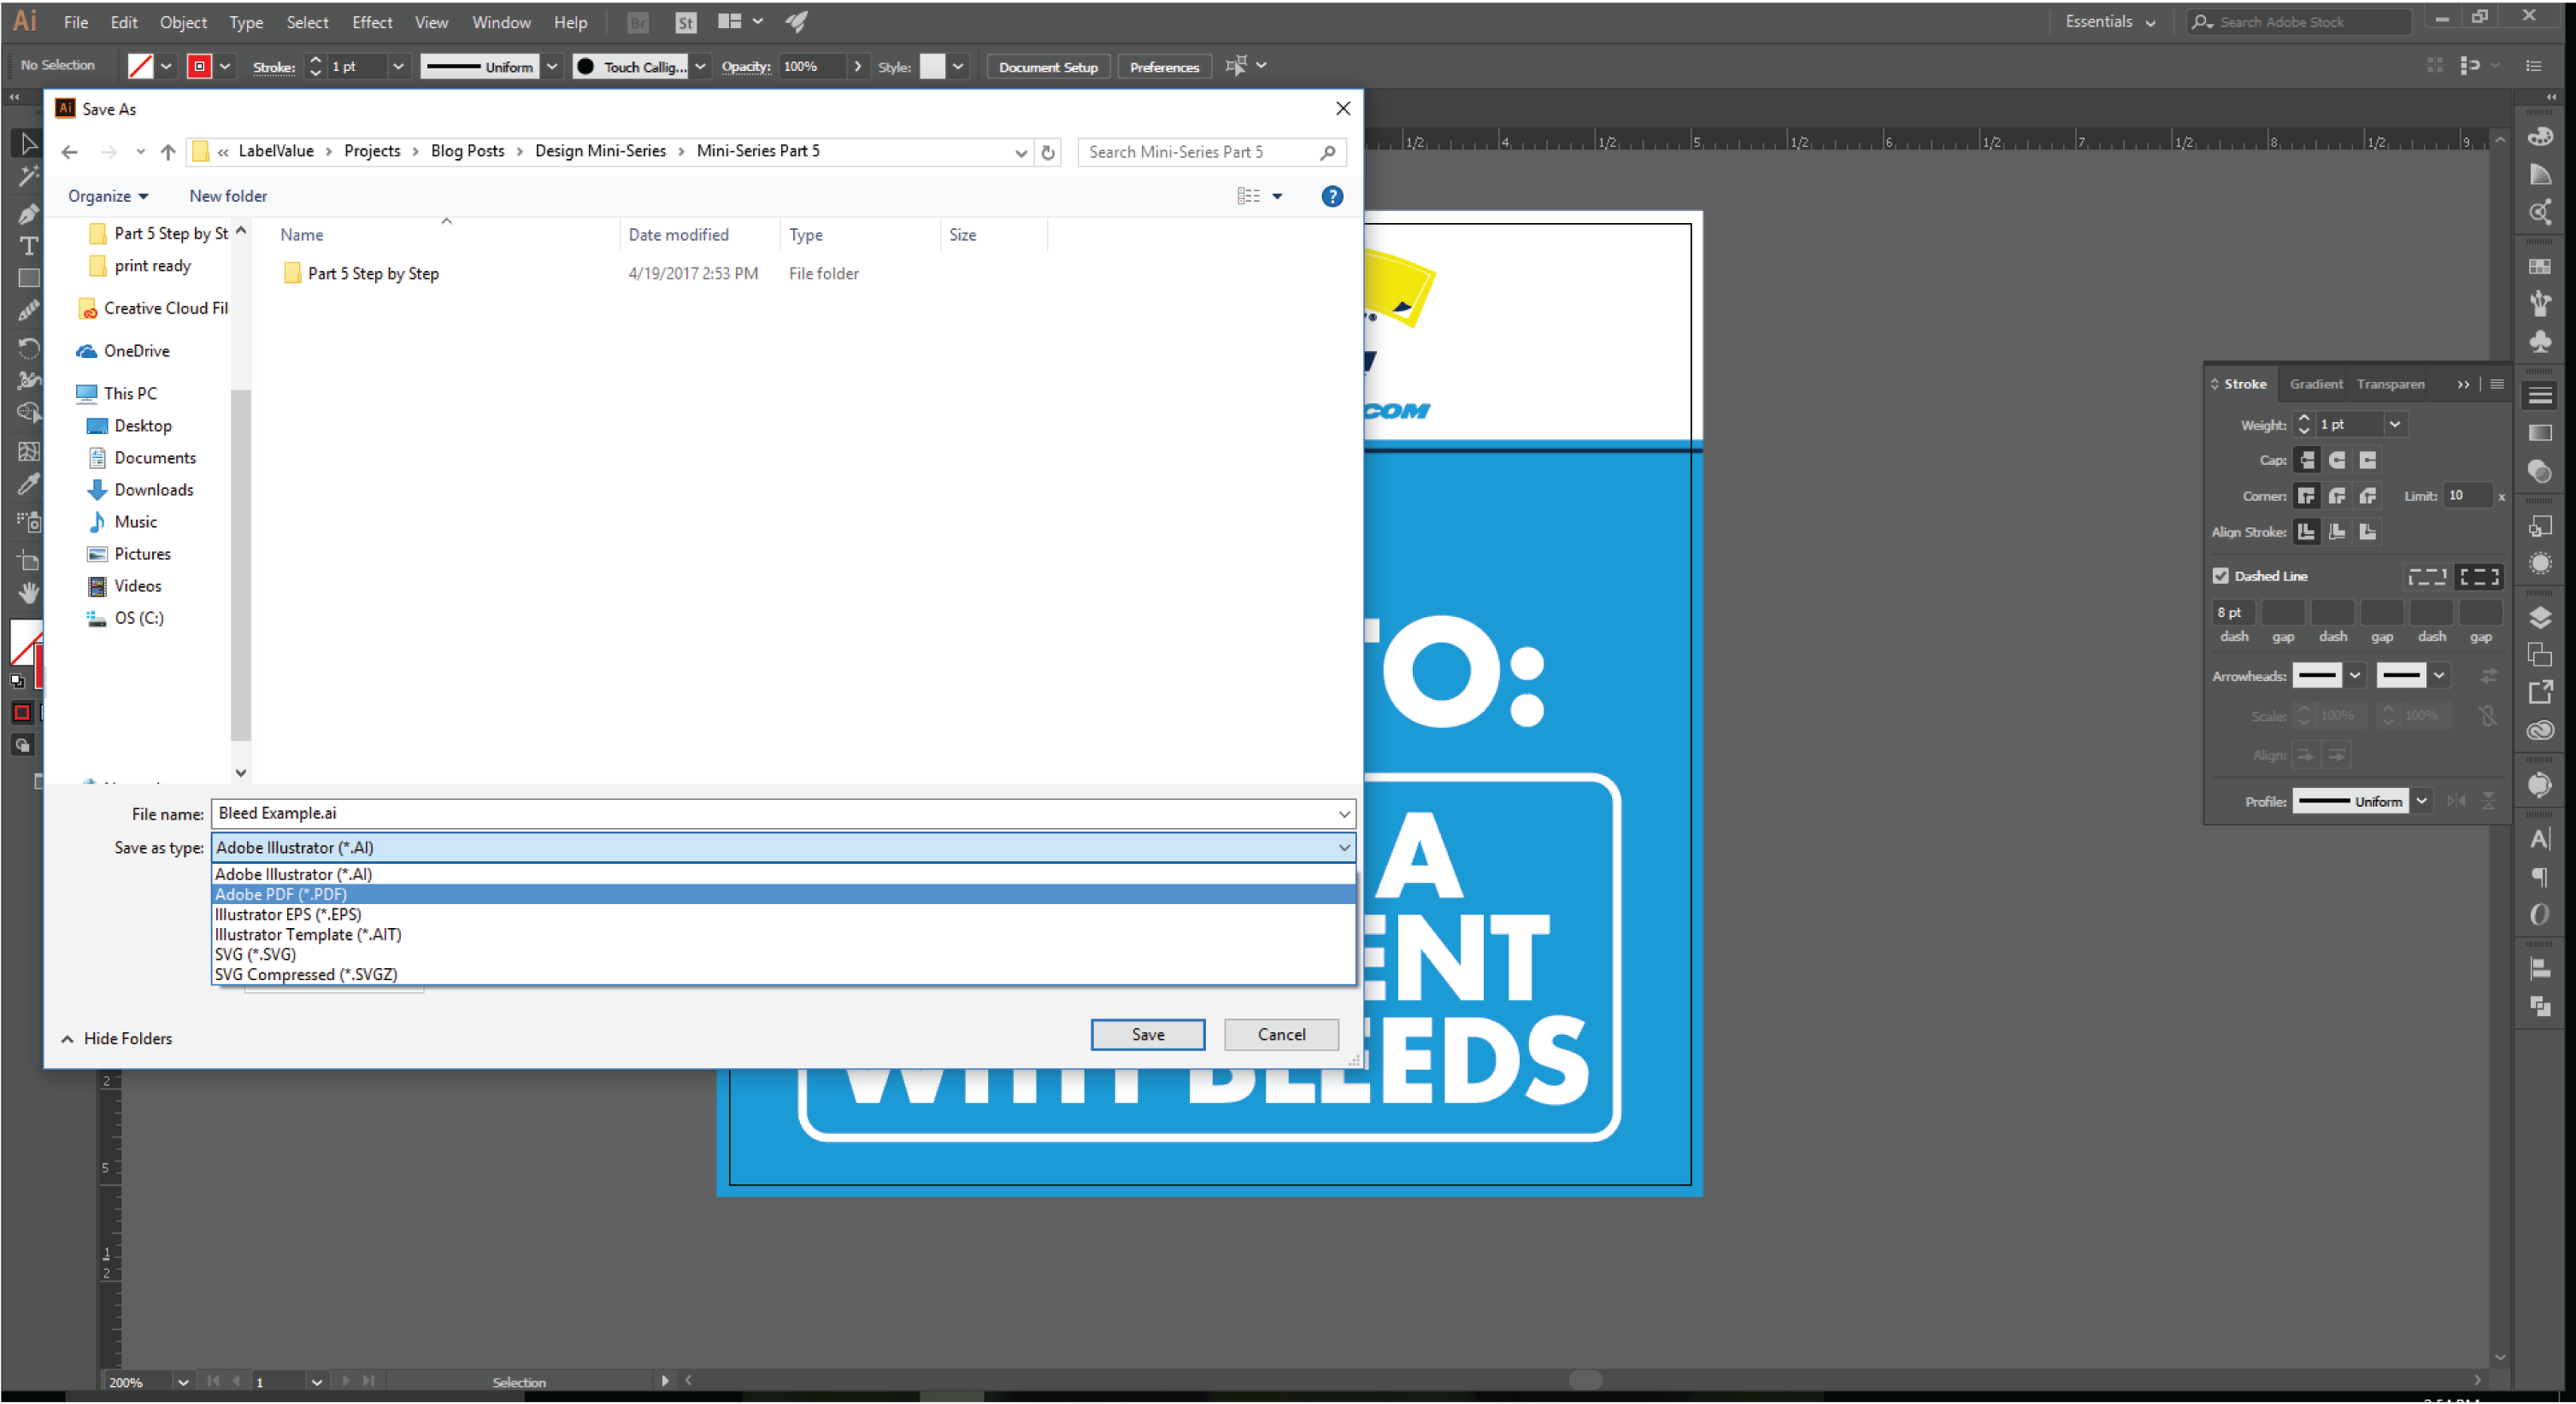
STEP 11: This will open a prompt to select where you desire to relieve your .PDF file. Nether the file type select "Adobe PDF". Click "Relieve".

Pace 12: This will open up up another prompt for your PDF Salve Every bit options. We advise Loftier Quality Print nether "Adobe PDF Preset".
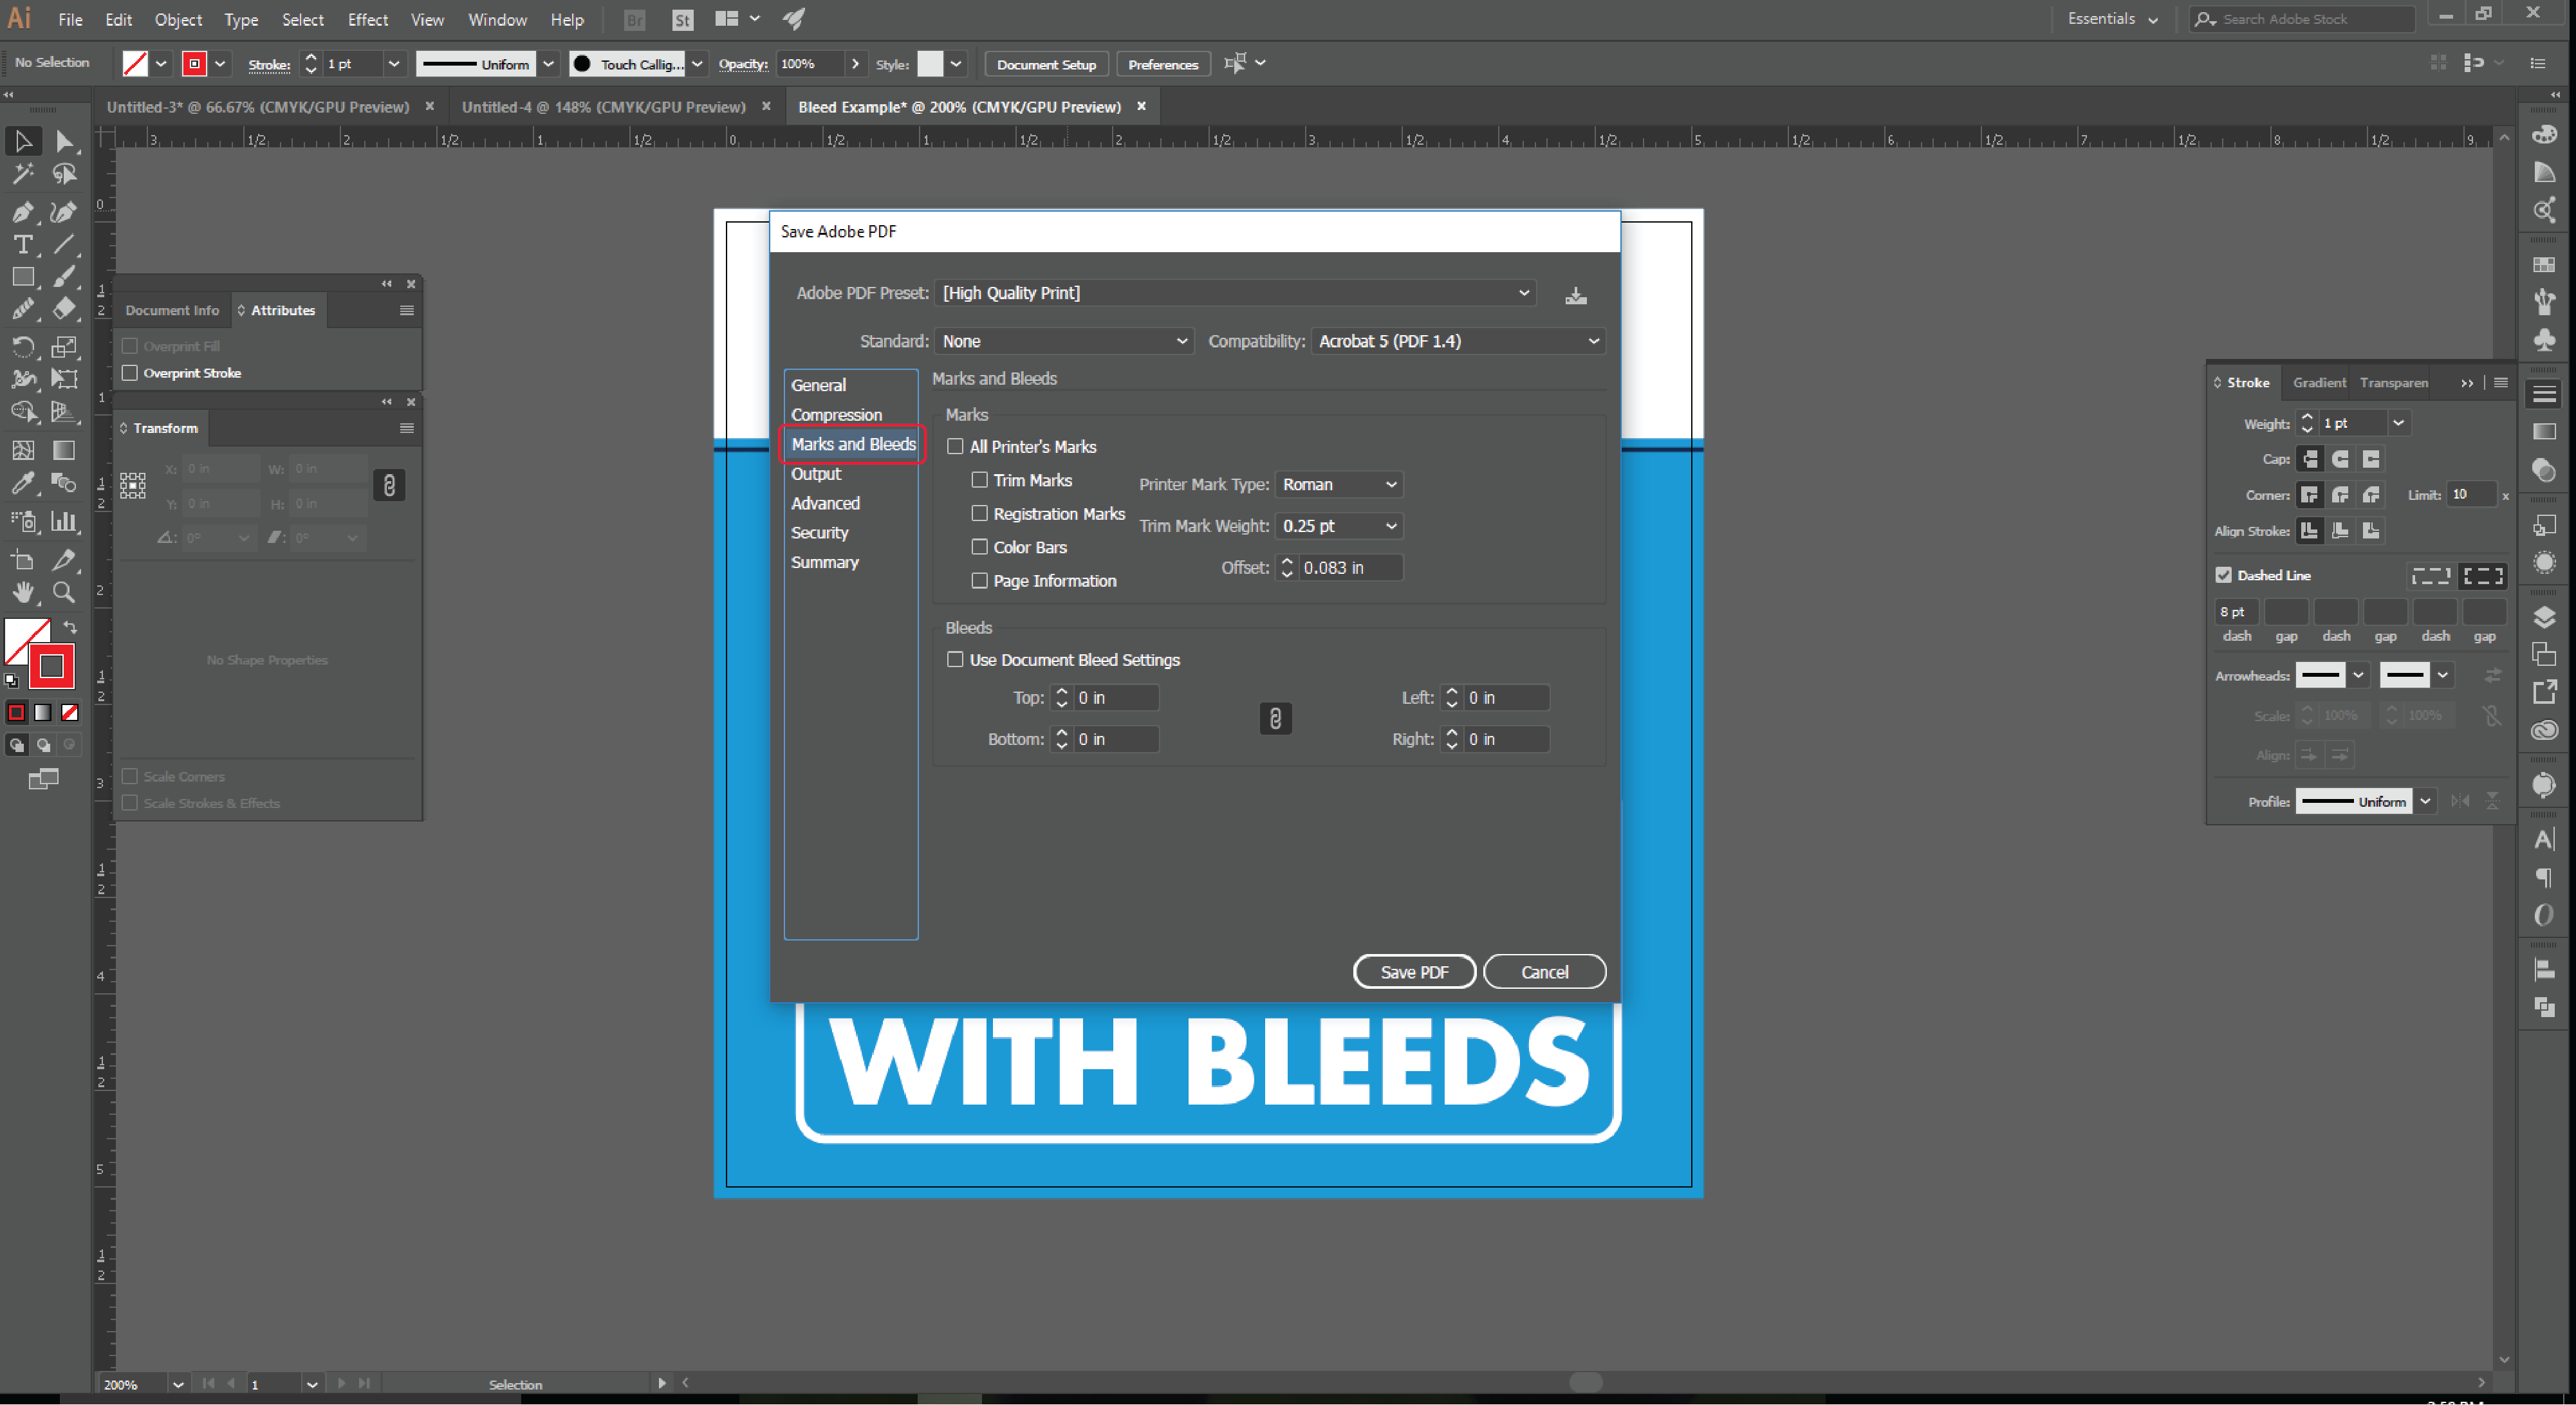
STEP 13: Now Navigate to "Marks and Bleeds" on the left-hand bill of fare.
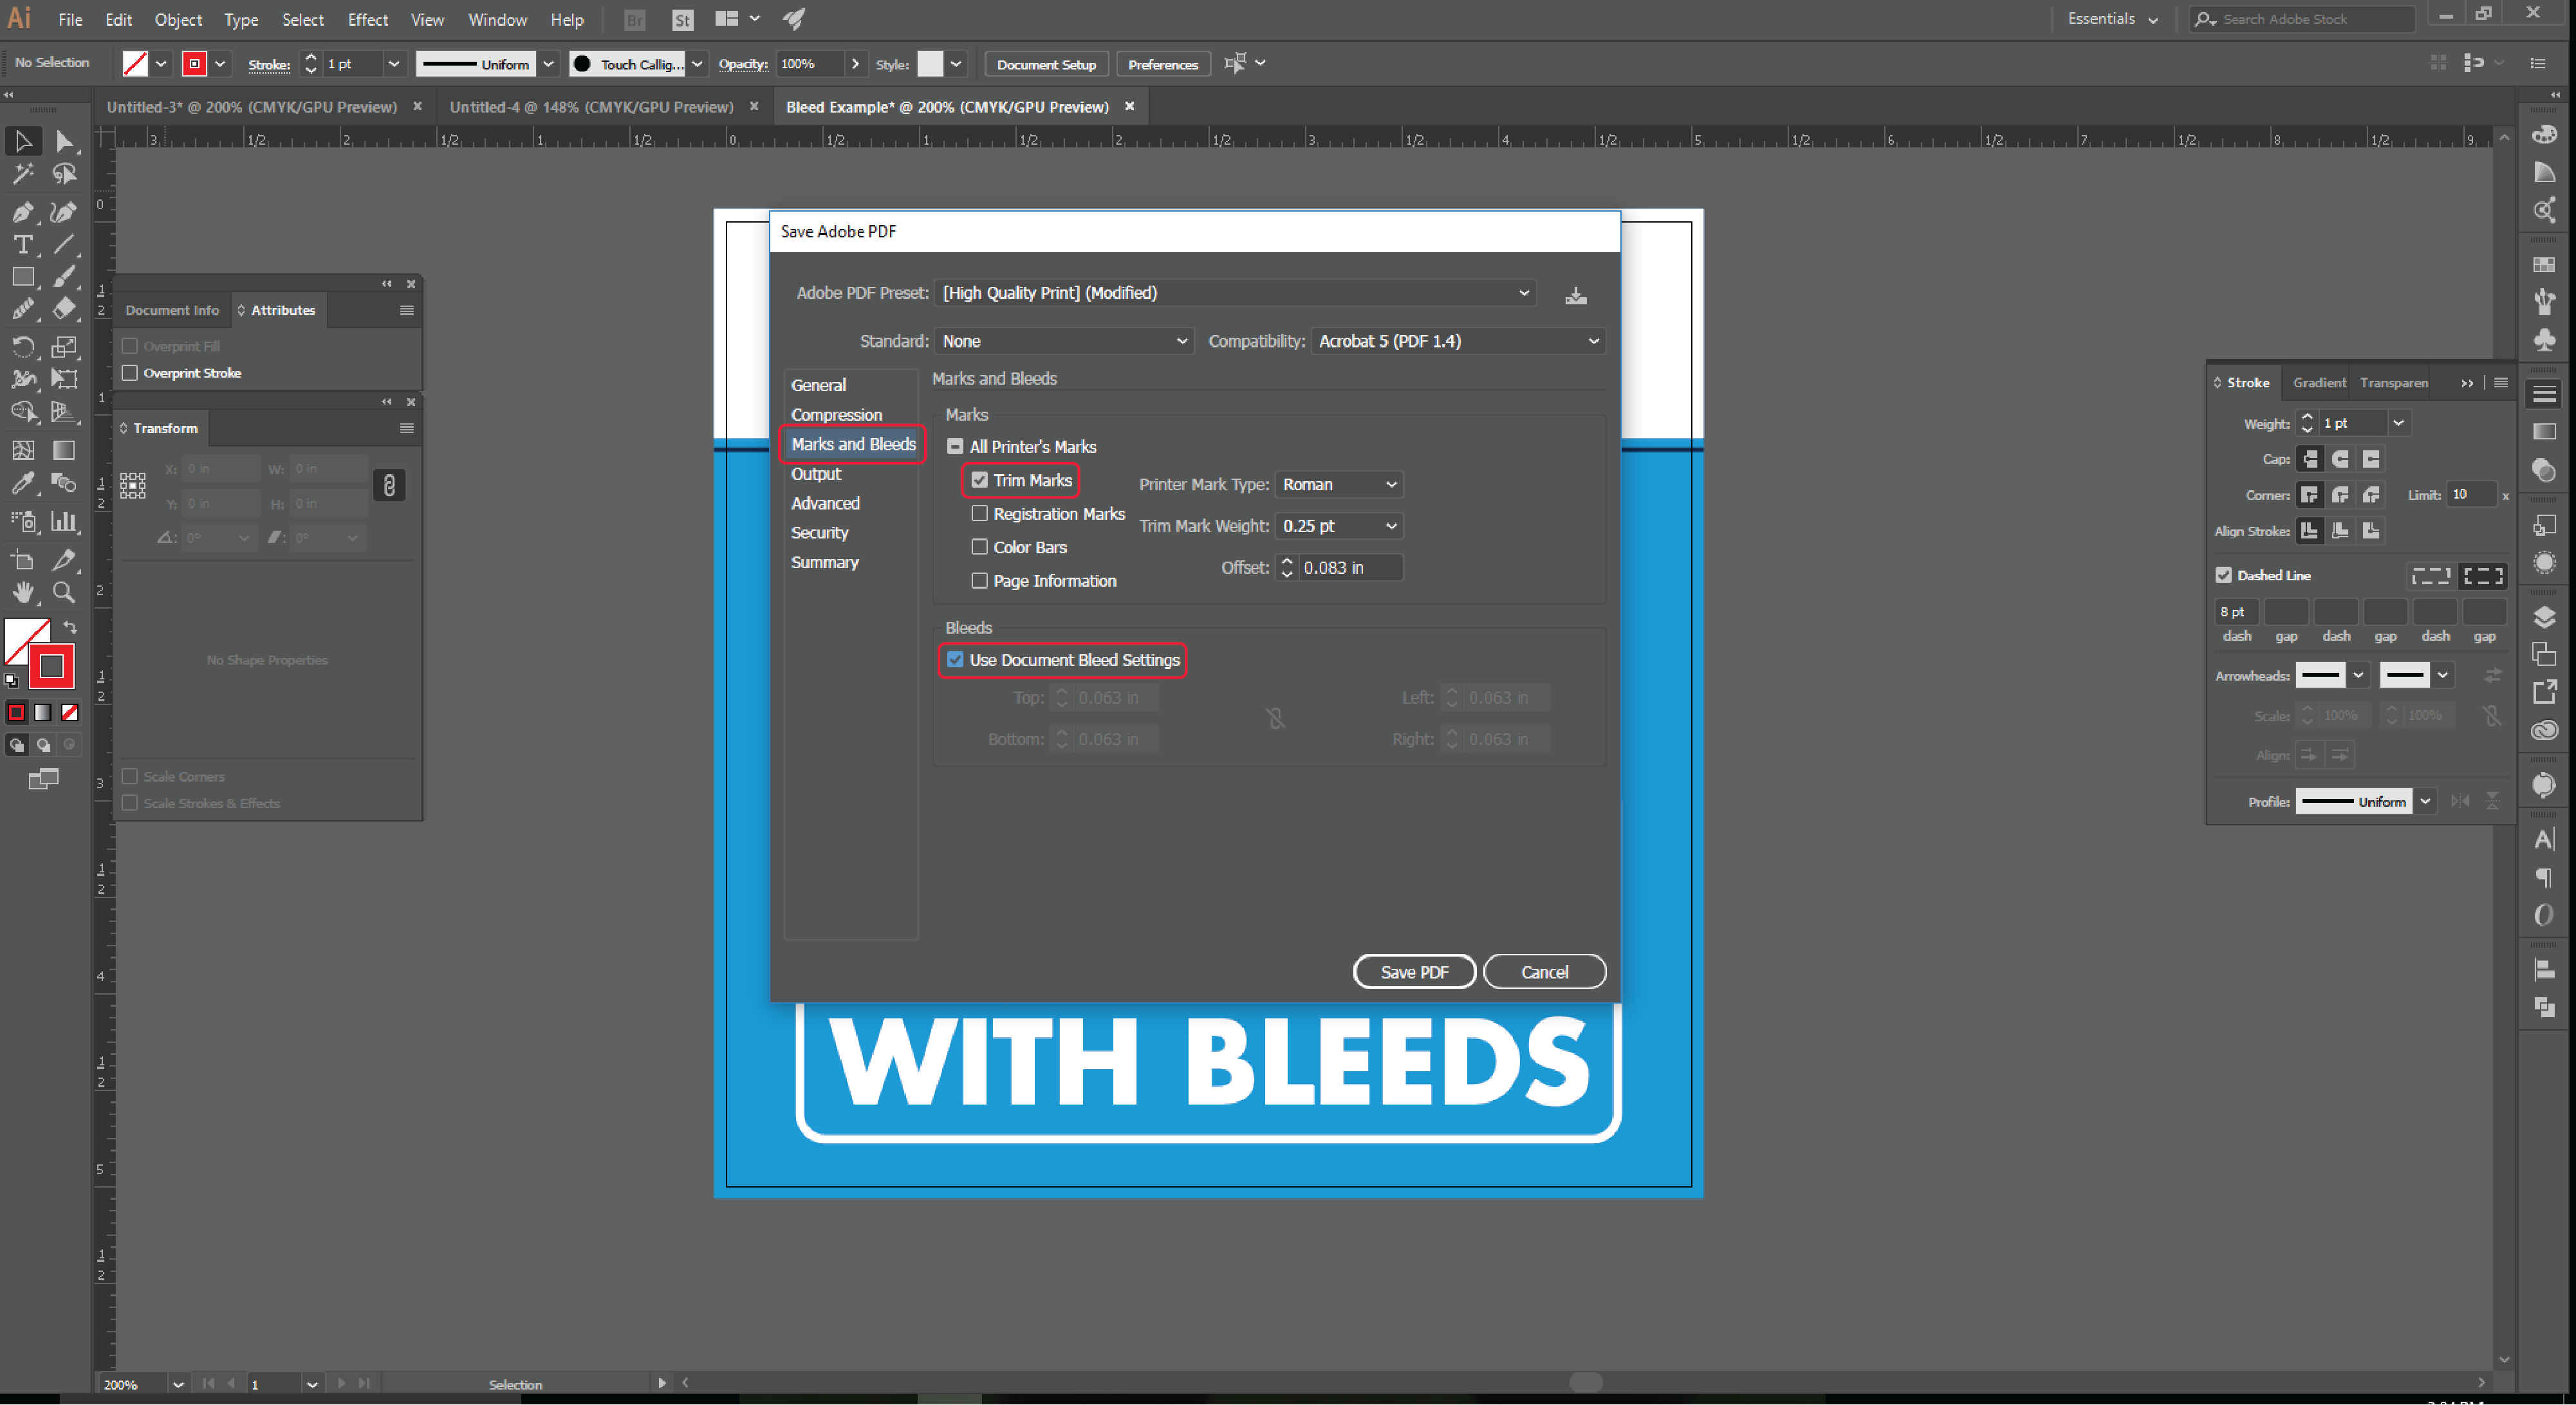
Pace 14: Under the "Marks and Bleeds" Menu, you can opt to include trim marks, also ordinarily known equally crop marks. These are guides on where to trim your bleeds. Some printers may request to include trim/ingather marks and some may request to not include them. This is an of import question to enquire when submitting artwork to be printed. For this example we will plow our crop marks on to show the last document with a bleed included. Click the "Trim Marks" box. Now also click the "Use Document Drain Settings" option located in the Bleeds submenu. See above for example.

Stride 15: Click "Salve PDF".

Step 16: Navigate to the PDF file y'all but saved and open it using Adobe Acrobat. Your document will appear with crop marks on all four corners. You lot now accept guides on where your document bleeds should be trimmed, to allow for full background color coverage.
What if yous had previously created artwork and merely realized you need to add a bleed? Starting time from scratch? Manually add a bleed? Not to fear! Adobe Illustrator makes information technology easy to add a bleed to an existing artboard.

Pace 1: Open up upwards the file yous demand to add together a bleed to. Navigate to File in the toolbar and select "Document Set up…"

Stride 2: This volition open up the "Certificate Set" Carte. Here there are various options yous can choose for your certificate. For this tutorial, nosotros will focus on "Bleed".

Pace 3: In the bleed option, input the amount of drain needed for your existing certificate. Brand certain the link icon is selected to brand all sides of your drain the same.

STEP iv: One time you have input your bleeds, select "OK". The "Document Setup" menu will close and your document volition at present include bleeds.
Take a question related to your artwork and its bleeds, or the Adobe Creative Suite? Send the states an email with your question to service@labelvalue.com with "Graphic Pattern Question" in the field of study.
Source: https://www.labelvalue.com/blog/how-to-set-up-document-bleeds-in-adobe-illustrator-design-tips-post-5
0 Response to "How To Set Up Bleed In Illustrator"
Post a Comment